 217 月
217 月

Of course! Making a unique medal is a fantastic project that blends creativity, craftsmanship, and meaning. The process can range from simple and hands-on to professional and manufactured.
Here’s a comprehensive guide on how to make a unique medal, broken down into different approaches.
Step 1: The Foundation – Design and Concept
Before you touch any materials, this is the most important step. A medal’s uniqueness comes from its story and design.
- Define the Purpose: What is the medal for?
- An award? Is it for a sports event, academic achievement, company recognition, or a personal “thank you”?
- A commemorative piece? For a wedding, anniversary, retirement, or a historical reenactment?
- A piece of art or jewelry? Just for aesthetic pleasure.
- Brainstorm the Theme: The purpose will guide your theme. A marathon medal might feature a runner and a distance, while a retirement medal could incorporate symbols of a career and hobbies for the next chapter.
- Sketch Your Design: Don’t worry about being a perfect artist. Draw the Obverse (front) and Reverse(back). Key elements include:
- Central Image/Motif: The main symbol.
- Text: What does it say? (e.g., “1st Place,” “In Recognition Of,” a name, a date).
- Border/Shape: Will it be a standard circle, or something unique like a star, shield, or custom shape?
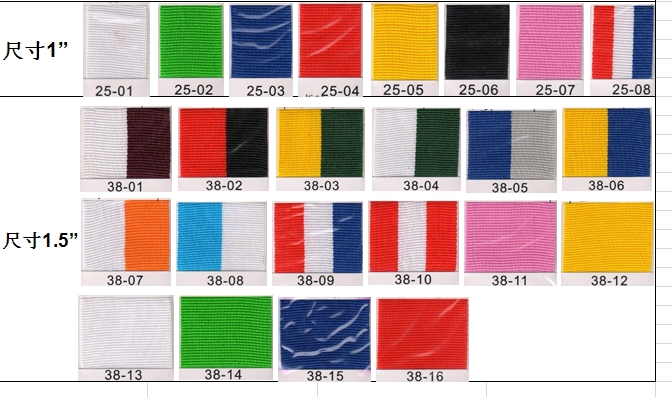
- Ribbon Attachment: How will the ribbon connect? A simple loop, a fancy clasp, or integrated into the design?
Step 2: Choose Your Method and Materials
The method you choose depends on your budget, tools, skills, and desired quantity.
Method 1: DIY & Handcrafted (For a Single, Personal Medal)
This is great for a one-of-a-kind, artistic piece.
Materials:
- Polymer Clay (e.g., Sculpey): Very versatile, can be baked hard in a home oven. You can sculpt fine details, mix colors, and even add metallic powders.
- Air-Dry Clay: Simpler, no oven needed, but can be more brittle.
- Apoxie Sculpt or Milliput (Two-Part Epoxy Putty): Hardens like rock, can be carved and sanded after hardening, takes fine detail.
- Wood: Can be laser-cut (if you have access) or hand-carved.
- Cold-Cast Resin: You can create a mold and pour resin mixed with metal powder (e.g., bronze, copper) for a metallic look without a foundry.
- Basic Tools: Rolling pin, sculpting tools, knives, sandpaper, paints (acrylics, enamel), varnish, ribbon.
Process:
- Sculpt: Create your medal design in your chosen material.
- Harden: Bake (polymer clay) or let air-dry according to instructions.
- Finish: Sand it smooth. Paint it. Use metallic waxes or paints for a metal-like finish. Apply a protective varnish.
- Add Ribbon: Attach a ribbon through a drilled hole or an attached loop.
Method 2: 3D Printing (Bridge between DIY and Pro)
Perfect for complex, geometric, or custom-shaped medals. You can design it on a computer and bring it to life.
Process:
- 3D Model: Create a 3D model of your medal using software like Tinkercad (beginner), Fusion 360 (intermediate), or Blender (advanced).
- Print: Use your own 3D printer or an online service.
- Materials:
- PLA (Common): Easy to print, can be painted.
- Resin (SLA/DLP printing): Incredibly high detail, smooth surface, ideal for intricate designs.
- Metal-Filled Filament: Filament with metal particles; after printing, you can polish and treat it to look like real metal.
- Materials:
- Post-Process: Sand, prime, and paint your print. For a premium look, you can electroplate a 3D-printed resin medal with real gold, silver, or copper.
Method 3: Professional Manufacturing (For Quality & Quantity)
This is the way to create traditional, durable metal medals, typically for events or organizations needing multiple copies.
Process:
- Create a Final Design: You need a high-resolution digital file (vector art, like an .AI or .SVG file). A graphic designer can create this from your sketch.
- Choose a Manufacturer: Search for “custom challenge coins,” “custom medals,” or “custom lapel pins.” They specialize in small batch production.
- Choose the Technique:
- Die Struck: The traditional, highest-quality method. A metal “die” is created and used to stamp the design into a metal blank with immense pressure. Results in sharp details and a textured feel. Best for larger quantities due to die cost.
- Die Cast: Molten metal is poured into a mold. Great for 3D shapes and thicker medals.
- Photo-Etched: Uses a chemical process to etch the design into the metal. Good for very fine lines and smaller batches, but less “3D” than die-striking.
- Choose Finishes:
- Metals: Zinc alloy (most common), bronze, brass, silver, or even gold plating.
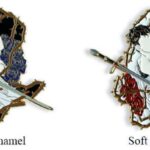
- Enamel Colors: Areas of the medal can be filled with colored enamel (soft enamel has a textured feel, hard enamel is perfectly smooth and durable).
- Antiquing: A dark wash is applied to make the recessed details stand out.
- Add Ribbon: The manufacturer will attach a custom ribbon based on your specifications.
Step 3: The “Unique” Touches – How to Truly Stand Out
This is where you elevate your medal from standard to extraordinary.
- Unconventional Shape: Move beyond the circle. Think gears, animals, logos, or abstract shapes.
- Mixed Materials: Combine metal with wood, resin, leather, or even a small piece of stone or glass.
- Interactive Elements:
- Spinning Center: A part of the medal that rotates.
- Cut-Outs: Designs that have holes or openings as part of the aesthetic.
- Lever or Hinge: A small moving part.
- Personalization: Engraving the recipient’s name and the date on the back instantly makes it unique to them.
- Meaningful Symbolism: Bake the story into the design. A medal for a board game champion could look like a game piece. A medal for a book club could have a sculpted book on the front.
- The Ribbon: Don’t use a generic ribbon. Weave a custom one with specific colors, print text on it, or use a unique material like silk or a woven band.
Summary: A Simple Path to Get Started
If you’ve never made a medal before, here’s a great beginner project:
- Concept: Design a “Best Friend” medal.
- Method: Use polymer clay.
- Process:
- Roll out a circle of clay.
- Use a knife or sculpting tool to carve/write “World’s Best Friend” and the year.
- Press a real coin or texture tool into the clay to create a background pattern.
- Bake according to clay instructions.
- Once cool, dry-brush with metallic acrylic paint (e.g., gold) to highlight the raised details.
- Drill a small hole, thread a nice ribbon through it, and present it to your friend!
The key is to start with a clear idea and choose a method that matches your resources. Have fun with itOf course! Making a unique medal is a fantastic project that blends creativity, craftsmanship, and meaning. The process can range from simple and hands-on to professional and manufactured.
Here’s a comprehensive guide on how to make a unique medal, broken down into different approaches.
Step 1: The Foundation – Design and Concept
Before you touch any materials, this is the most important step. A medal’s uniqueness comes from its story and design.
- Define the Purpose: What is the medal for?
- An award? Is it for a sports event, academic achievement, company recognition, or a personal “thank you”?
- A commemorative piece? For a wedding, anniversary, retirement, or a historical reenactment?
- A piece of art or jewelry? Just for aesthetic pleasure.
- Brainstorm the Theme: The purpose will guide your theme. A marathon medal might feature a runner and a distance, while a retirement medal could incorporate symbols of a career and hobbies for the next chapter.
- Sketch Your Design: Don’t worry about being a perfect artist. Draw the Obverse (front) and Reverse(back). Key elements include:
- Central Image/Motif: The main symbol.
- Text: What does it say? (e.g., “1st Place,” “In Recognition Of,” a name, a date).
- Border/Shape: Will it be a standard circle, or something unique like a star, shield, or custom shape?
- Ribbon Attachment: How will the ribbon connect? A simple loop, a fancy clasp, or integrated into the design?
Step 2: Choose Your Method and Materials
The method you choose depends on your budget, tools, skills, and desired quantity.
Method 1: DIY & Handcrafted (For a Single, Personal Medal)
This is great for a one-of-a-kind, artistic piece.
Materials:
- Polymer Clay (e.g., Sculpey): Very versatile, can be baked hard in a home oven. You can sculpt fine details, mix colors, and even add metallic powders.
- Air-Dry Clay: Simpler, no oven needed, but can be more brittle.
- Apoxie Sculpt or Milliput (Two-Part Epoxy Putty): Hardens like rock, can be carved and sanded after hardening, takes fine detail.
- Wood: Can be laser-cut (if you have access) or hand-carved.
- Cold-Cast Resin: You can create a mold and pour resin mixed with metal powder (e.g., bronze, copper) for a metallic look without a foundry.
- Basic Tools: Rolling pin, sculpting tools, knives, sandpaper, paints (acrylics, enamel), varnish, ribbon.
Process:
- Sculpt: Create your medal design in your chosen material.
- Harden: Bake (polymer clay) or let air-dry according to instructions.
- Finish: Sand it smooth. Paint it. Use metallic waxes or paints for a metal-like finish. Apply a protective varnish.
- Add Ribbon: Attach a ribbon through a drilled hole or an attached loop.
Method 2: 3D Printing (Bridge between DIY and Pro)
Perfect for complex, geometric, or custom-shaped medals. You can design it on a computer and bring it to life.
Process:
- 3D Model: Create a 3D model of your medal using software like Tinkercad (beginner), Fusion 360 (intermediate), or Blender (advanced).

- Print: Use your own 3D printer or an online service.
- Post-Process: Sand, prime, and paint your print. For a premium look, you can electroplate a 3D-printed resin medal with real gold, silver, or copper.
Method 3: Professional Manufacturing (For Quality & Quantity)
This is the way to create traditional, durable metal medals, typically for events or organizations needing multiple copies.
Process:
- Create a Final Design: You need a high-resolution digital file (vector art, like an .AI or .SVG file). A graphic designer can create this from your sketch.
- Choose a Manufacturer: Search for “custom challenge coins,” “custom medals,” or “custom lapel pins.” They specialize in small batch production.
- Choose the Technique:
- Die Struck: The traditional, highest-quality method. A metal “die” is created and used to stamp the design into a metal blank with immense pressure. Results in sharp details and a textured feel. Best for larger quantities due to die cost.
- Die Cast: Molten metal is poured into a mold. Great for 3D shapes and thicker medals.
- Photo-Etched: Uses a chemical process to etch the design into the metal. Good for very fine lines and smaller batches, but less “3D” than die-striking.
- Choose Finishes:
- Metals: Zinc alloy (most common), bronze, brass, silver, or even gold plating.
- Enamel Colors: Areas of the medal can be filled with colored enamel (soft enamel has a textured feel, hard enamel is perfectly smooth and durable).
- Antiquing: A dark wash is applied to make the recessed details stand out.
- Add Ribbon: The manufacturer will attach a custom ribbon based on your specifications.
Step 3: The “Unique” Touches – How to Truly Stand Out
This is where you elevate your medal from standard to extraordinary.
- Unconventional Shape: Move beyond the circle. Think gears, animals, logos, or abstract shapes.
- Mixed Materials: Combine metal with wood, resin, leather, or even a small piece of stone or glass.
- Interactive Elements:
- Spinning Center: A part of the medal that rotates.
- Cut-Outs: Designs that have holes or openings as part of the aesthetic.
- Lever or Hinge: A small moving part.
- Personalization: Engraving the recipient’s name and the date on the back instantly makes it unique to them.
- Meaningful Symbolism: Bake the story into the design. A medal for a board game champion could look like a game piece. A medal for a book club could have a sculpted book on the front.
- The Ribbon: Don’t use a generic ribbon. Weave a custom one with specific colors, print text on it, or use a unique material like silk or a woven band.
Summary: A Simple Path to Get Started
If you’ve never made a medal before, here’s a great beginner project:
- Concept: Design a “Best Friend” medal.
- Method: Use polymer clay.
- Process:
- Roll out a circle of clay.
- Use a knife or sculpting tool to carve/write “World’s Best Friend” and the year.
- Press a real coin or texture tool into the clay to create a background pattern.
- Bake according to clay instructions.
- Once cool, dry-brush with metallic acrylic paint (e.g., gold) to highlight the raised details.
- Drill a small hole, thread a nice ribbon through it, and present it to your friend!
The key is to start with a clear idea and choose a method that matches your resources. Have fun with it
Recent Posts
- silkprinting’s function in hard enamel and soft enamel badges
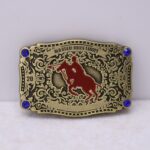
- The Silent Promise of a Belt Buckle
- How to make a unique and collectable medal?

- Let’s talk about the wearing positions of pins and the selection of pins accessories

- What is the difference of soft enamel and hard enamel?
Blog Categories
217 月
 158 月
158 月
 288 月
288 月
 039 月
039 月
 119 月
119 月
 259 月
259 月